
The useDebugValue hook in React is a powerful tool that enables developers to enhance the debugging experience of custom hooks.
By providing custom labels and values for hooks in the React DevTools, useDebugValue empowers developers to understand better and inspect the state and behaviour of their custom hooks.
This quick guide will explore the fundamentals of useDebugValue and how to leverage it effectively in your React projects.
If you like, you can jump straight to the source code here (don’t forget to star ⭐⭐⭐)
Check out the YouTube version of this post:
Understanding the Purpose of useDebugValue
Before diving into the details, it’s essential to grasp the purpose of useDebugValue. The primary objective of this hook is to provide additional information to React DevTools about the custom hooks you create.
Using useDebugValue, you can assign a label and value to a custom hook, enabling easier identification and inspection during debugging sessions.
Basic Usage of useDebugValue
The useDebugValue hook is straightforward to use. Typically, you invoke it inside your custom hook, passing in the desired label and value. React DevTools will display this information when inspecting the custom hook in the DevTools panel.
We’ll use a simple example to demonstrate its usage and benefits later in this article.
Enhancing a Custom Hook with useDebugValue
Let’s consider a hypothetical custom hook called useWindowWidth, which tracks the window’s width. By leveraging useDebugValue, we can provide meaningful information about the current window width during debugging.
We’ll explore how to implement this enhancement step by step, including the useDebugValue invocation and its impact on the React DevTools display.
Leveraging Custom Labels and Values
One of the key advantages of useDebugValue is the ability to provide custom labels and values, enabling better understanding and debugging. We’ll explore scenarios where custom labels and values can be used effectively, such as providing additional context, including formatted or derived values, and offering more descriptive information about the hook’s internal state.
Conditional Debug Values
Sometimes, you may want to display debug values based on certain conditions conditionally. This section will cover techniques to conditionally set debug values using useDebugValue, allowing you to display relevant information only when specific conditions are met. This can be particularly useful for avoiding clutter in the React DevTools panel.
Advanced Debugging Techniques
Beyond basic usage, useDebugValue offers advanced debugging capabilities. We’ll explore techniques such as using functions as debug values, lazy evaluation of debug values, and integrating useDebugValue with other debugging tools and libraries. These techniques can help you debug complex custom hooks and gain deeper insights into their behaviour.
Example 1 – Basic Usage of useDebugValue
Starting with a custom hook, useWindowWidth:
const useWindowWidth = () => {
  const [windowWidth, setWindowWidth] = useState(window.innerWidth);

  useEffect(() => {
    const handleResize = () => {
      setWindowWidth(window.innerWidth);
    };

    window.addEventListener('resize', handleResize);

    // Clean up the event listener on unmount
    return () => {
      window.removeEventListener('resize', handleResize);
    };
  }, []);

  return windowWidth;
};
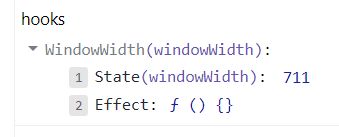
This is what we see in the dev tools if we run an app that uses the above hook:
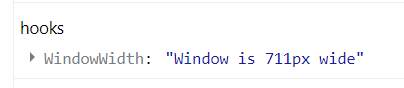
If we add a simple useDebugValue call we can give more meaning to the value column of the hook in the DevTools. For example, if we add the following:
useDebugValue(`Window is ${WindowWidth}px wide`)
We will be able to see the following in the React DevTools:
Example 2 – Creating a useful label
We can extend the above example to something a little more useful. For example, if we wanted the hook label to show us the window width based on a set of standard window sizes we could do the following:
useDebugValue(getScreenSizeLabel(windowWidth));
The getScreenSizeLabel function could be defined as:
const getScreenSizeLabel = (width) => {
  if (width < 576) {
    return 'Extra Small (xs)';
  } else if (width < 768) {
    return 'Small (sm)';
  } else if (width < 992) {
    return 'Medium (md)';
  } else if (width < 1200) {
    return 'Large (lg)';
  } else {
    return 'Extra Large (xl)';
  }
};
This would create the following output in the DevTools panel:

Example 3 – Using Formatting
The useDebugValue hook takes a second optional parameter: format
This parameter allows you to use a function to format your data for display. Following on from the previous examples, we can update the call to useDebugValue to look like this:
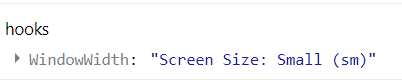
useDebugValue(getScreenSizeLabel(windowWidth), (value) => `Screen Size: ${value}`);
By using the formatting function we can control the format of our output:
Conclusion
The useDebugValue hook is an invaluable tool for enhancing the debugging experience of custom hooks in React. By providing custom labels and values, developers can gain better insights into the state and behaviour of their hooks during debugging sessions.
By following the guidelines and examples in this quick guide, you can harness the power of useDebugValue to streamline your debugging process and improve the overall quality of your React projects.
As always, feel free to have a look around at my other React articles:
